


A Week of Thanksgiving Prep / the (annual) turkey brine debate
I rock the "mixed method" DRY BRINE all the way...and why you should, too

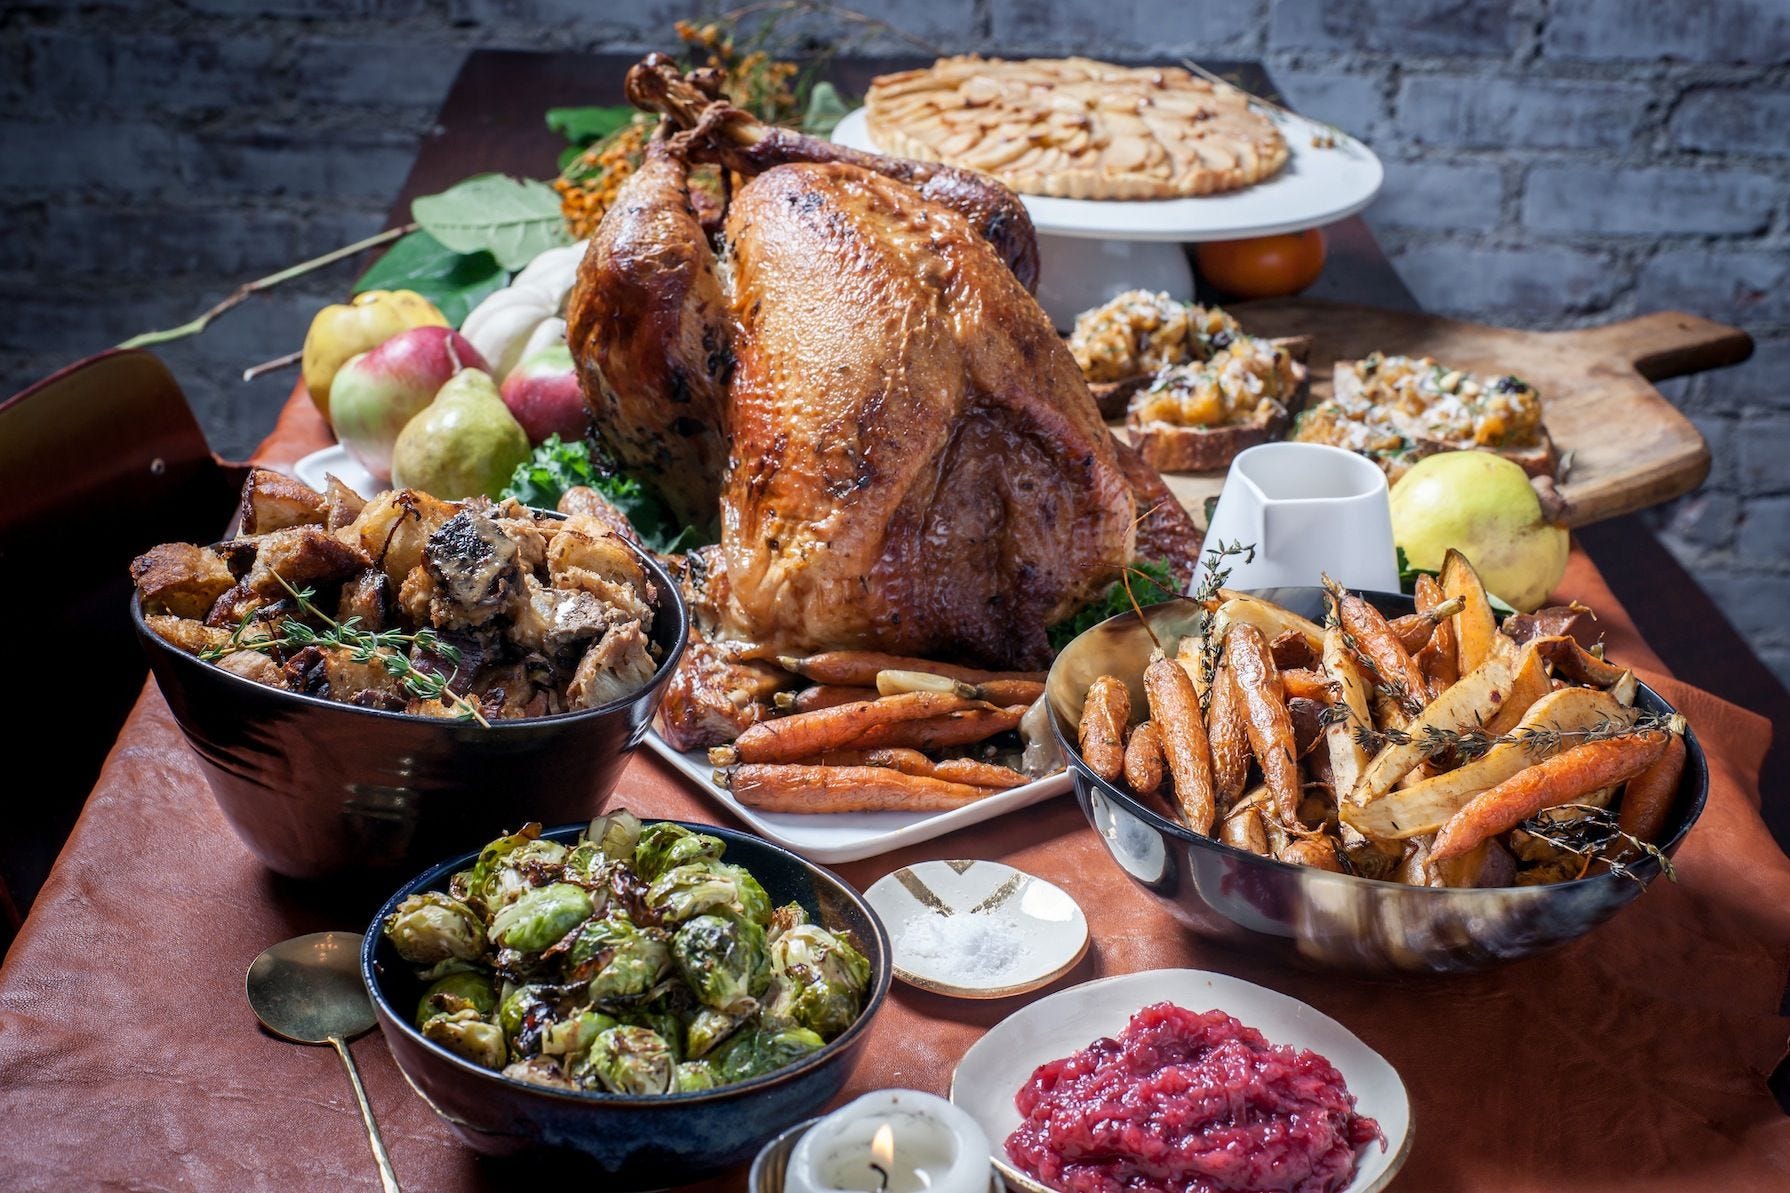
Honestly, turkey is my favorite item to cook on a Thanksgiving menu. Yes, you can laugh and smirk and roll your eyes because turkey gets the bag from most from of us - it can be dry AF and tasteless and make you want to steer so clear of it that you dive deep into mashed potatoes and one too many whiskey cocktails without any decent protein consumed and then you’re cursing that turkey the morning after for not being edible and leaving you with a decently massive hangover/headache. BUT, if prepared and roasted well, turkey can be moist and juicy and just perfectly salty and a deliciously meaty canvas for gravy and all the sides that are really often the stars of the show.
Don’t put turkey in a corner, I beg you. It’s not like you need anymore Thanksgiving content than is already inundating your inbox and Insta feed, but here’s one more to add to the pile, because why not, and because I think there’s value in making a case for a dry-brined turkey. Over the course of this coming week, I’ll share 3 (free) post including a recipe, some notes, do’s and definitely don’ts from prior Thanksgiving trials, some historical nostalgia and hopefully some tiny piece of inspiration for your 2024 holiday table—finding gratitude in the small things (like really delicious apple pie), may well just keep us mindfully moving forward. And if you’re a reader and don’t celebrate Thanksgiving (I’m writing to you all my Danish and international subscribers), maybe you’ll get some thrill from a new recipe this week that can translate to a celebratory table all of your own.

Ok, so turkey. It’s an annual dilemma, a debate over what preparation method is absolutely the savior of a dry, inedible Thanksgiving centerpiece. I have been a full subscriber to the dry-brine method and have been for years..and then I tried a mixed method a few years ago and will never go back. First things first, let’s admit that turkeys can too often be literally flavorless (regardless of how well you’ve seasoned them). I think it definitely helps spending a little extra and getting a well-raised turkey. I’ve found that free-range turkeys raised by a farmer in my broader community / regional area, are typically much more flavorful. But, back to the brining. Why brine in the first place? A turkey is a big hunk of meat. It needs some time before cooking to get flavor locked in and help protein / muscle fibers relax (which makes the meat more juicy). A wet brine is typically my rule of thumb for other poultry, like a roast chicken. But a turkey is freaking large y’all, and it takes up enough space already in your fridge and then to add a huge container or cumbersome plastic bag filled with liquid brine just feels…well, annoying and risky given the potential for leaking. Which is not what you want to be dealing with the morning of Thanksgiving…turkey water all over your grandmother’s green bean casserole, mmm (for the record, I have never been a fan of green bean casserole nor did my own grandmother ever make to my recollection).
A dry-brine mixture of salt (a LOT of it) and spices/aromatics, allows for a few things:
the salt, when left on the turkey for at least 24 hours, really penetrates the skin and meat and activates a process of osmosis where the salt helps draw out internal moisture, that moisture helps dissolve the salt, the salt seeps back into the turkey and your result is a juicy, well-salted, well-flavored turkey, without the bath-time mess.
dry-brining the turkey and leaving it open-air in the fridge for a number of hours (usually I opt for 24-48 hours), helps dry out the skin which enables it to get super nice and crispy, and that’s honestly kind of the best part.
In 2020, I decided to go rouge and do a mixed method mostly dry-brine with a light blanket of buttermilk merely brushed onto the skin before salting and spicing. Maybe it was pandemic fatigue that made me go a little crazy and wild, but I’m so glad I did. The brushed on, very thin layer of buttermilk adds just enough acid to the turkey to make it even more juicy and it’s thin enough, that it has time to soak in and dry out open air in the fridge before roasting so it doesn’t impact skin crispiness quality.
So here’s a outline for a mixed method (mostly) dry-brined turkey…the lead up when and how to brine, and then the cooking process.
Mixed Method (Mostly) Dry-Brined Roast Turkey
1 turkey (big or bigger, see notes on salting quantities below, and cooking times below in method section)
Buttermilk, about 1 cup or 250ml will be more than plenty
Kosher salt (or sea salt for all you internationals) **1 1/2 teaspoons of salt per every pounds of turkey
1 teaspoon or so of black pepper, ground
*any other ground spices or aromatics you wish to add along with the salt and pepper (ground fennel, coriander, other peppercorn colors / varietals, cumin, chili flakes, sumac etc)
2 tablespoons brown sugar
__
6 oz / 170g / 1 ½ sticks unsalted butter, room temperature
Variety of fresh wintry herbs (rosemary, thyme, sage - whatever mix you fancy), about 3-4 tablespoons total after mincing
4-5 garlic cloves, finely minced into a paste (or roasted garlic cloves that are then mashed)
1 tablespoon date molasses* optional if available (this helps the skin to be nice and golden colored, but not necessary)
1 small bunch of carrots, roughly chopped
3 celery stalks, roughly chopped
2 small-medium onions, diced
1 small bunch hakurei turnips, quartered *optional, but indeed quite tasty with turkey pan juices
1 additional head of garlic with the top trimmed off
2 tablespoons neutral oil or olive oil
1 lemon, halved
Black pepper
Kitchen twine
Tuesday (before Thanksgiving)
On the Tuesday before Thanksgiving, removed any giblets from the inside of the turkey and reserve them for the bottom of the pan to add flavor to pan juices / your eventual gravy. Give the turkey a nice massage with the buttermilk, then rub it all over with salt per quantities noted above (so 5-6 tablespoons salt for a 12 pound bird, 1/2 cup of salt for a 20 pound bird etc). Rub in the black pepper and brown sugar as well (the brown sugar helps with achieving a nice golden brown skin). Refrigerate in a dish or ideally on a rack atop a baking sheet (the rack allows for better air circulation to dry out the skin). Flip the turkey once the following day for even skin-drying. *if you’re working with a frozen turkey, thaw it a few days prior (like Saturday or Sunday of the week before Tgiving), as it’ll need a good amount of time to thaw out.
Wednesday (before Thanksgiving)
Bring the butter to room temperature to make a compound butter. Mix with garlic and finely minced herb mixture. Add in the date molasses (if you’re using it) to impart a bit of nice color on the turkey. Butter can be left covered on the counter top until Thursday so it remains soft and workable at room temperature ready for use.
Thursday / Thanksgiving
About 3 hours before cooking, remove the turkey from fridge, pat it dry and bring to room temperature. At room temperature, rub bird down with compound butter mixture--rubbing all over bird and beneath the skin. Truss the turkey legs with kitchen twine and tuck the wings under the skin if possible.
Toss carrots, celery, onions and turnips with oil lightly to coat. Season vegetables with salt and black pepper. Place veg mix in roasting pan. Place the turkey neck and any giblets available, in the roasting pan along with the veg mix as well.
Toss the head of garlic with oil and place it along with the lemon, 3-4 thyme sprigs, 3-4 sage springs and/or a few rosemary sprigs in the turkey cavity. Place turkey in roasting pan breast side up.
Preheat your oven to 425F / 220C (slightly lower or higher) depending on how hot your oven runs. Roast the turkey for 30 minutes uncovered to give the skin a nice quick flash. Then lower temperature to 375-385F / 190-200C, baste the turkey with a pastry brush or a spoon with any drippings, give the veg mix a quick stir and tent the turkey with aluminum foil (so the skin doesn’t burn while it’s doing it’s nice looong roast). Rotate the roasting pan 180 degrees to ensure even cooking. Roast the turkey an additional 1.5-2 hours depending on the size of your turkey (approximately 12-14 minutes per pound of turkey so a 20# turkey will probably take almost 3.5-4 hours in total). Baste the turkey every 30-45 minutes with pan drippings to create nice coloration on the skin and keep that bird good and moist. Keep rotating the pan 180 degrees when you do a basting break to ensure even cooking / coloration (most home ovens have hot spots). Remove the aluminum foil for the final 20 minutes of cooking to give the breast nice coloration and crispy skin. Take the internal temperature with a digital thermometer after about 2-2.5 hours and keep checking back, you want the internal temp to reach 165F / 75C and internal juices to run clear to know the turkey is good and ready. Use the pan drippings and all the roasted veg and juicy bits for the base of your gravy…those pan drippings are literal gold! Save the neck for nibbling and/or turkey soup/stock. Rest the turkey on a cutting / carving board at least 10 or 15 minutes before carving.
